Colourful Owl
Product Code : DP28503🚚 Expected Delivery Date Dec 04, 2024 - Dec 25, 2024

Couldn't load pickup availability
What's included
What's included
When choosing your size please note that smaller sizes will show less detail than larger sizes.
Description:
DIY 5D Diamond Painting Kit
Full Drill (the whole picture is to be worked)Frame is not included
Each kit includes:
1 x printed canvasMore than enough drills to complete the painting1 x pick up pen, tray and glue set
Everything you need to complete the painting is included in the kit.
*Please note; Most of our diamond art kits are printed on demand. It typically takes 7-15 business days to get your diamond art kit printed, shipped and delivered. Thank you for your understanding.
What Size To Choose
What Size To Choose

Shipping & Delivery
Shipping & Delivery
After the order has been placed, it takes 24-48 hours to dispatch the products. Once dispatched you should receive your order within approximately 7-15 days.
What Are AB Drills?
What Are AB Drills?
AB is short for Aurora Borealis. This refers to the solid colour diamond drills with a beautiful Aurora Borealis rainbow coat that gives it an opalescent shine on the surface. The appearance can differ, it can be a shiny soft pearl-like coating to a strong dual-colour reflection.
They are used to highlight parts of the diamond painting pattern adding dazzling and mesmerizing effects to the art, just like the northern light it got its name from

This is the comparison of the regular diamonds & Aurora Borealis:

This picture is showing AB drills included in a diamond painting to give a better effect:

Choosing Square or Round Diamonds
Choosing Square or Round Diamonds
In choosing between square and round drill also referred to as diamonds, it's important to know that there are no right answers. Choice of diamond shape entirely depends on YOUR preference :)
Although square drills line up more easily resulting to a fuller more complete look on the canvas, round drill diamonds have a better grip making a seamless color spread of the completed picture. Both contribute a sparkly finish.


Choosing A Custom Image Guide
PLEASE READ THE INFORMATION BELOW ON HOW TO CHOOSE THE BEST PHOTO FOR A CUSTOM DIAMOND PAINTING. Please note, there is no returns or refunds on custom diamond paintings.
Each kit includes:
- 1 x printed canvas
- More than enough drills to complete the painting
- 1 x pick up a pen, tray and glue set
Everything you need to complete the painting is included in the kit.
* Please note; Most of our diamond art kits are printed on demand. It typically takes 10-15 business days to get your diamond art kit printed, shipped and delivered. Thank you for your understanding.
Choosing a Photo
HERE ARE THE 3 SECRETS TO CHOOSING THE PERFECT PHOTO FOR YOUR CUSTOM DIAMOND PAINTING:
1. Choose Only Large High-Quality Photos.
2. Pay Attention To The Colors And Shading Of Your Original Photo.
3. Pick The Canvas That Best Fits Your Photo.
----
1. CHOOSE ONLY VERY LARGE HIGH-QUALITY PHOTOS.
Only submit a photo that is:
- Very Large
- Very High-Quality
- Taken In Good Light
**If your image is even a little bit blurry or pixellated when you look at it, it will NOT work as a diamond painting. Images need to be super high quality to work.**
What makes a good photo? Pixels.
Now for the sake of metaphor, imagine each pixel is a nice little diamond.
The more pixels (diamonds) you can pack into an image (canvas), the more detail you get in your painting.
We need your photo to have a LOT of pixels (diamonds). That way, when we blow your photo up and print it onto a canvas, your final painting will look as crystal clear as your original photo.

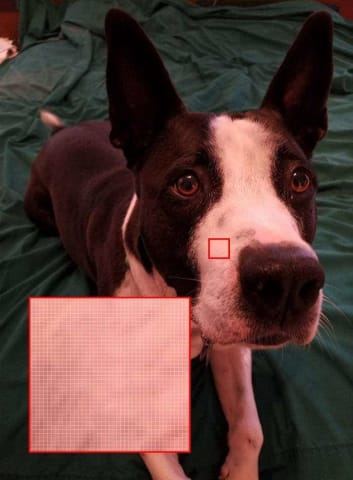
IF YOUR IMAGE LOOKS BAD (BLURRY, PIXELLATED) WHEN YOU ZOOM IN: Choose a different image. Your original image is too small to be turned into a diamond painting. Please choose a different image for the best results.
QUICK TIP: If you have any doubts about your image, use a photo-viewing program to zoom in to your image and see how the image looks. If you're on your phone, simply pinch your screen and zoom in to see how the picture looks up close.

2. PAY ATTENTION TO THE COLORS AND SHADING OF YOUR ORIGINAL PHOTO.
One of the most common questions we hear: "Why is the white part of my diamond painting a different colour? Why does the black part of my painting contain brown and green diamonds?"
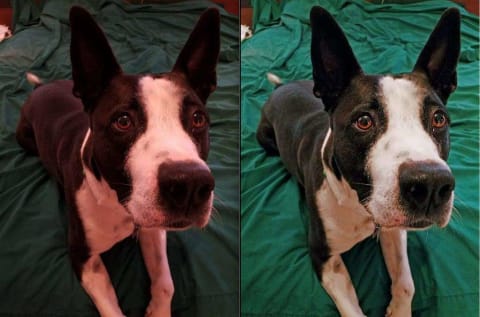
If your original photo is slightly red, or slightly blue, that colour will be magnified 1000x when we turn your photo into a diamond painting kit.
And when there's a slight red hue on your entire photo, that red bleeds into parts of your painting you would expect to be white. Check this out, for example:

When we blow up your photo, every pixel becomes much more obvious. It's kind of like looking at your face in one of those super close-up mirrors. You notice every pore, wrinkle, spot, whatever. With your diamond painting, you'll notice every pixel you place with a colour that just feels "off."
To stop this from happening, we recommend making some basic colour and tone adjustments in your favourite photo editing program before submitting your photo for a custom. For a free tool you can use to make these adjustments on your own, you can check out LunaPic - https://www11.lunapic.com/editor/

What a world of difference some basic colour adjustments can make! Pay close attention to the colours and hues in your original photo!
3. PICK THE CANVAS THAT BEST FITS YOUR PHOTO.
The 2 important things to pay attention to here:
1. Canvas Size: How Big Should Your Canvas Be?
2. Canvas Orientation: Do I Need A Landscape, Portrait, Or Square Canvas?
How Big Should Your Canvas Be?
Let me counter your question with another question: how many people, dogs, etc. are in your photo?
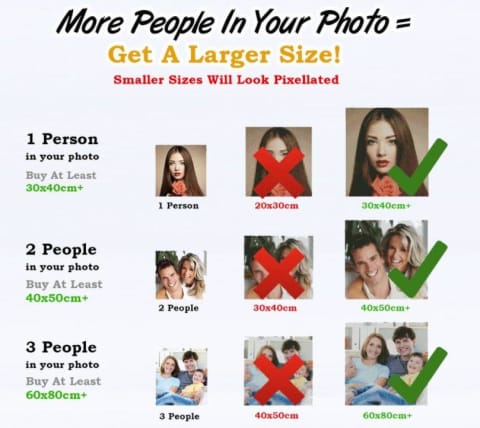
Consult the helpful chart below as a reference for what size canvas you should order based on how many people are in your photo!
**We advise that the subject of your photo take up most (70-90%) of the frame for the ideal diamond painting.

When in doubt, here's a good rule of thumb our fans swear by: the larger the canvas you order, the more detail your diamond painting will have.


